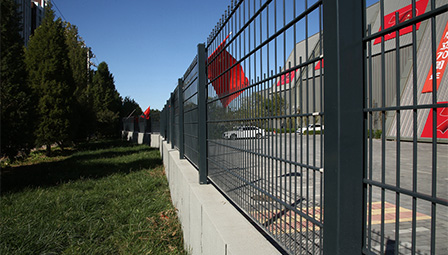
Tips for Installing Durable Metal Garden Fence Posts for Your Outdoor Space
Jul . 31, 2024 13:28Installing Metal Garden Fence Posts A Step-by-Step Guide
When it comes to enhancing the beauty and security of your garden, installing a metal fence can be a great choice. Metal garden fence posts are durable, long-lasting, and available in a variety of styles and heights, making them a popular option for many homeowners. In this article, we will provide you with a step-by-step guide to installing metal garden fence posts, ensuring that your fencing project is both successful and satisfying.
Step 1 Gather Your Materials
Before you start your installation, it’s essential to gather all the necessary materials and tools. You will need
- Metal fence posts - Concrete mix - Gravel - A post hole digger or auger - A level - A measuring tape - A string line - Protective gloves - A hammer or mallet
Make sure to also check local regulations and fencing laws, which may dictate the height, style, or location of your fence.
Step 2 Plan Your Fence Layout
Using a measuring tape, determine the outline of your fence. Keep in mind the length needed for the metal posts, which are often set into the ground at least 1/3 of their length for stability. Use a string line to visualize the fence line and mark the location of each post with stakes or spray paint on the ground. This will help you maintain a straight line for your fence.
Step 3 Dig the Post Holes
Once your layout is established, you can begin digging the post holes. Using a post hole digger or auger, dig holes that are at least 2 to 3 feet deep, depending on the height of the posts and the type of soil. Ensure that the holes are wide enough to allow for gravel and concrete to be added for stability.
installing metal garden fence posts

Step 4 Set the Posts
Insert the first metal post into the hole, making sure it stands vertically. Use a level to check that it is straight. It's important to adjust the positioning before the concrete sets. Pour about 6 inches of gravel into the bottom of the hole for drainage, then fill the hole with the concrete mix, following the manufacturer’s instructions for mixing and pouring. Make sure to leave some concrete above ground level to prevent water from pooling at the base of the post.
Step 5 Check for Height and Alignment
As you install each subsequent post, continue to use the level to ensure each post is vertical. You can also run a string line between the posts to check for level and alignment. It’s crucial to maintain uniformity for a professional-looking fence.
Step 6 Allow Concrete to Set
Once all posts are installed and secured with concrete, it’s critical to allow the concrete to cure properly. Typically, this can take 24 to 48 hours, depending on weather conditions. Ensure that no one touches or leans on the posts during this time, as this can shift them out of alignment.
Step 7 Install the Fencing Panels
With the posts securely in place, you can now attach your fencing panels. Depending on your design, you can either attach the panels using brackets or weld them directly to the posts. Make sure to follow the manufacturer’s instructions for whatever fencing system you have chosen.
Conclusion
Installing metal garden fence posts can be a rewarding DIY project that significantly enhances your garden's appeal and security. By following these steps carefully and ensuring that you take your time during each phase, you will create a strong, durable fence that can withstand the elements for years to come. With your new fence in place, you can enjoy peace of mind while adding a stylish touch to your outdoor space.
Copyright © 2025 Hebei Minmetals Co., Ltd. All Rights Reserved. Sitemap | Privacy Policy


